目录
- 简介
- 基于 CAppDialog 创建面板
- AppWindow 能够做什么
- CAppDialog 对象的结构
- 对象继承的结构
- 去哪里找用于创建对象的主要常数以及如何使用 #undef 来重新定义它们
- 如何增加新的控件: 两个按钮
- 嵌套的控件是如何移动和绘制的
- 通过 CDialog 把 CAppDialog 加到控件组中
- 怎样重写标准控件的行为
- 怎样读取事件处理类型的内建宏定义
- 创建您自己的面板 – 这很简单!
简介
即使到了现在,大多数为 MetaTrader 5 平台开发指标和 EA 交易的开发人员都不在他们的应用程序中使用图形界面,我相信这是因为标准库的面板与对话框类只提供了方法的简单技术描述,语言参考部分提供了代码示例,并且带有许多图形控件的有关注释。但是您无法在完全了解它们的结构和思路之前就开始创建您自己的面板。
我尝试过理解面板是如何处理的,现在,我想和其他开发者来分享取得的知识。我从一个简单应用程序开始,它基于CAppDialog类创建一个图形面板,然后,我会逐步修改它,并且分析取得的结果。
本文提供了 CAppDialog 类运行的所需详细信息: 怎样创建面板,最少需要哪些函数,以及如何加上另外的元件(例如按钮)。我们将会分析面板所包含的对象,以及创建它们的顺序。我也将会演示在创建面板时使用哪些常数以及怎样修改它们。
基于 CAppDialog 创建面板
我们将从一些背景信息开始。
CAppDialog 是组合 “应用程序对话框” 控件的类,CAppDialog 类可视化地把一个 MQL5 应用程序中功能相关的不同元件组织在一起,
下面展示的是创建一个面板的最精简的代码:
//+------------------------------------------------------------------+
//|                                              LearnCAppDialog.mq5 |
//|                        Copyright 2018, MetaQuotes Software Corp. |
//|                                             https://www.mql5.com |
//+------------------------------------------------------------------+
#property copyright "Copyright 2018, MetaQuotes Software Corp."
#property link      "https://www.mql5.com"
#property version   "1.00"
#include <Controls/Dialog.mqh>

CAppDialog AppWindow;
//+------------------------------------------------------------------+
//| EA交易初始化函数                                                    |
//+------------------------------------------------------------------+
int OnInit()
  {
//--- 创建应用程序对话框
   if(!AppWindow.Create(0,"AppWindow",0,20,20,360,324))
      return(INIT_FAILED);
//--- 运行应用程序
   AppWindow.Run();
//--- 成功
   return(INIT_SUCCEEDED);
  }
//+------------------------------------------------------------------+
//| EA 交易终止函数                                                    |
//+------------------------------------------------------------------+
void OnDeinit(const int reason)
  {
//--- 销毁对话框
   AppWindow.Destroy(reason);
  }
//+------------------------------------------------------------------+
//| EA 交易图表事件函数                                                 |
//+------------------------------------------------------------------+
void OnChartEvent(const int id,         // 事件 ID
                  const long& lparam,   // 长整数类型的事件参数
                  const double& dparam, // 双精度小数类型的事件参数
                  const string& sparam) // 字符串类型的事件参数
  {
   AppWindow.ChartEvent(id,lparam,dparam,sparam);
  }
//+------------------------------------------------------------------+
LearnCAppDialog.mq5 EA 交易的执行结果就是创建控件面板:

LearnCAppDialog.mq5 EA 交易包含了用于创建面板以便运行的最少的命令集合,包含了下面的步骤:
- 在程序的全局级别声明一个 CAppDialog 类的实例:
#include <Controls/Dialog.mqh>

CAppDialog AppWindow;
//+------------------------------------------------------------------+
//| EA交易初始化函数                                                    |
//+------------------------------------------------------------------+
- 创建 AppWindow 面板以及运行面板:
int OnInit()
  {
//--- 创建应用程序对话框
   if(!AppWindow.Create(0,"AppWindow",0,20,20,360,324))
      return(INIT_FAILED);
//--- 运行应用程序
   AppWindow.Run();
//--- 成功
   return(INIT_SUCCEEDED);
  }
- Passing ChartEvent events to the AppWindow panel :
//+------------------------------------------------------------------+
//| EA 交易图表事件函数                                                 |
//+------------------------------------------------------------------+
void OnChartEvent(const int id,         // 事件 ID
                  const long& lparam,   // 长整数类型的事件参数
                  const double& dparam, // 双精度小数类型的事件参数
                  const string& sparam) // 字符串类型的事件参数
  {
   AppWindow.ChartEvent(id,lparam,dparam,sparam);
  }
还有最后一个非常重要的步骤:
- 通过调用 Destroy 方法销毁控件。
void OnDeinit(const int reason)
  {
//--- 销毁对话框
   AppWindow.Destroy(reason);
  }
如果我们没有提供面板的销毁,则每次改变时段或者交易品种的时候都会在已有元件的顶部再增加新的元件。
AppWindow 能够做什么
基于 CAppDialog 的面板从理论上可以处理下面的事件:
//+------------------------------------------------------------------+
//| 事件                                                              |
//+------------------------------------------------------------------+
#define ON_CLICK                (0)   // 点击控件的事件
#define ON_DBL_CLICK            (1)   // 双击控件的事件
#define ON_SHOW                 (2)   // 显示控件的事件
#define ON_HIDE                 (3)   // 隐藏控件的事件
#define ON_CHANGE               (4)   // 修改控件的事件
#define ON_START_EDIT           (5)   // 开始编辑的事件
#define ON_END_EDIT             (6)   // 编辑结束的事件
#define ON_SCROLL_INC           (7)   // 滚动条增加的事件
#define ON_SCROLL_DEC           (8)   // 滚动条减小的事件
#define ON_MOUSE_FOCUS_SET      (9)   //  "鼠标光标进入控件" 的事件
#define ON_MOUSE_FOCUS_KILL     (10)  // "鼠标光标退出控件"的事件
#define ON_DRAG_START           (11)  // "开始拖曳控件"的事件
#define ON_DRAG_PROCESS         (12)  // "正在拖曳控件"的事件
#define ON_DRAG_END             (13)  // "结束拖曳控件"的事件
#define ON_BRING_TO_TOP         (14)  // "鼠标事件优先级提高"的事件
#define ON_APP_CLOSE            (100) // "关闭应用程序"的事件
这些事件是包含在文件 [data folder]/MQL5/Include/Controls/Defines.mqh中的 Events 模块中的,所以,事件包含了单击,双击,开始和结束编辑,取得焦点,拖曳(开始,进行和结束),面板的显示和隐藏。操作这些事件的例子在面板与对话框部分的例子中提供,ON_CHANGE 事件是在CRadioGroup例子中处理的,ON_SCROLL_INC 和 ON_SCROLL_DEC 是在 CScrollV 中处理的,
CAppDialog 对象的结构
在一个空的图表中运行LearnCAppDialog.mq5EA交易,按下 Ctrl+B 并点击 “全部”,就可以看到面板上包含的全部对象:
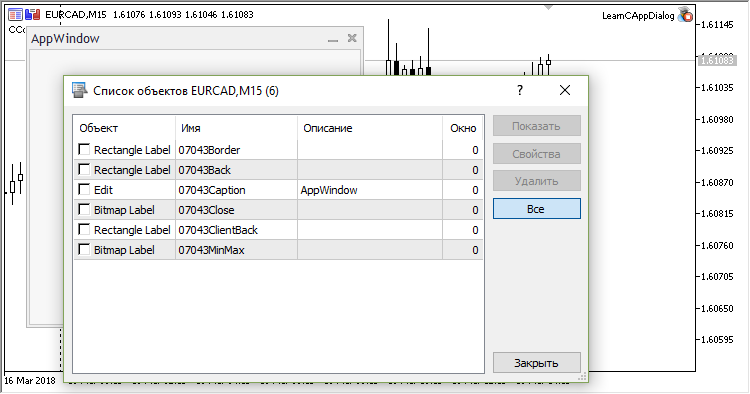
标准库的面板与对话框部分的对象是按照下面的顺序创建和使用的:首先创建”Border(边框)”对象,在其中会加上面板的背景,作为 “Back(背后的)”对象,然后,在背景上使用客户区域”ClientBack”。子控件可以在客户区域中加入,标题对象是面板的名称,并且包含两个控制按钮,是加在面板的顶部的。

这个过程可以用结构展示来参考这些对象的创建顺序:
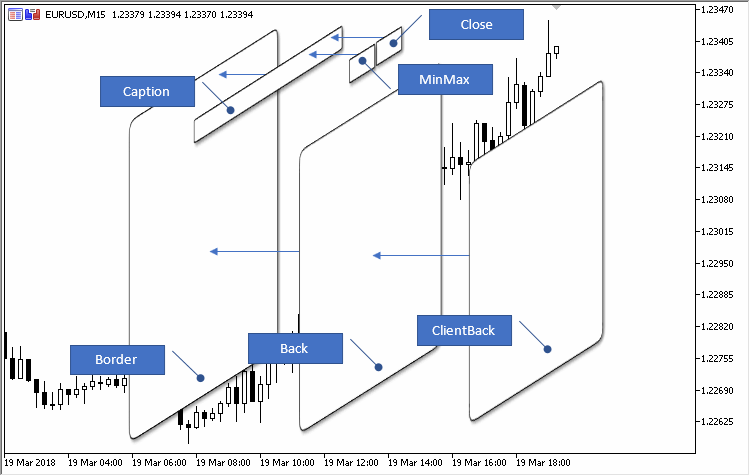
Border(边框)对象是OBJ_RECTANGLE_LABEL ,使用了白色边框设置 (默认用于所有面板). 所以, Border 对象只是用于美观的目的: 它显示了白色的边框,而Border对象的主体部分将被隐藏在Back(背景)对象的后面。
对象继承的结构
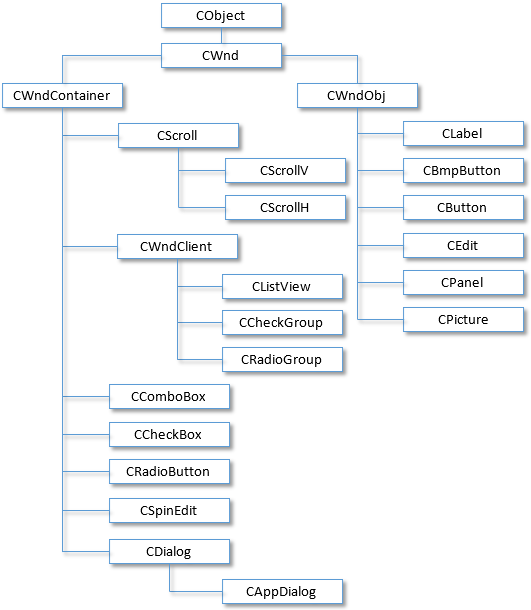
可能看起来面板与对话框部分有很多类,其中包含了扩展关系和继承结构,但是层次是非常简单的。所以,如果您理解了 CAppDialog 包含了什么以及它是如何创建的,理解其他类将也会很简单。这里是标准库中所有类的继承结构:
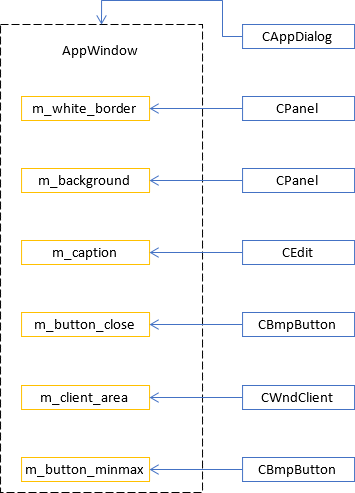
在 LearnCAppDialog.mq5 EA 交易中的 AppWindow 面板包含了6个对象,其中的每一个都有它们特定的任务。
基于 CAppDialog 的面板可以在 EA 交易或者指标中创建,但是,面板的创建会根据程序类型 (EA 交易或者指标) 来创建,并且还依赖于创建面板程序所运行的子窗口:
- 如果程序是一个 EA 交易 (运行程序的类型是 PROGRAM_EXPERT), 则面板只能创建在主窗口 (窗口索引是 “0”) 并且只使用 CAppDialog::CreateExpert 方法。
- 如果程序是一个指标 (运行程序的类型是 PROGRAM_INDICATOR), 则会检查程序所运行的窗口的编号:
- 如果是主窗口 (窗口编号是 0), 面板就使用 CAppDialog::CreateIndicator 方法来创建,
- 如果是一个子窗口,就要使用 CAppDialog::CreateExpert 方法来创建面板。
CAppDialog::CreateIndicator 方法的特有功能是,在创建面板的时候会自动进行以下操作:
- 调整到窗口宽度
- 调整窗口高度以容纳面板
指标面板的例子 [data folder]/MQL5/Indicators/Examples/Panels/SimplePanel/SimplePanel.mq5 在创建后和最小化:

CreateExpert 在主窗口(窗口编号为0)中创建一个面板,表明创建面板的程序是一个 EA 交易。
这些规则中有一个例外: 在指标中也可以在主窗口中创建面板,在这种情况下,将会使用 CreateIndicator 方法来创建面板。
去哪里找用于创建对象的主要常数以及如何使用 #undef 来重新定义它们
代码将在 AppWindowEditDefine.mq5 EA 交易中实现。
面板以及它的控件的基本常数位于 [data folder]/MQL5/Include/Controls/Defines.mqh 文件中, 它会与 CWnd 类关联:
//+------------------------------------------------------------------+
//|                                                          Wnd.mqh |
//|                   Copyright 2009-2017, MetaQuotes Software Corp. |
//|                                              http://www.mql5.com |
//+------------------------------------------------------------------+
#include "Rect.mqh"
#include "Defines.mqh"
#include <Object.mqh>
class CDragWnd;
继承的层次如下:
- CWnd
- CWndContainer
- CDialog
- CAppDialog
我们对下面的一组常数最感兴趣:
//+------------------------------------------------------------------+
//| 绘图风格和颜色                                                      |
//+------------------------------------------------------------------+
//--- 通用
#define CONTROLS_FONT_NAME                  "Trebuchet MS"
#define CONTROLS_FONT_SIZE                  (10)
//--- 文字
#define CONTROLS_COLOR_TEXT                 C'0x3B,0x29,0x28'
#define CONTROLS_COLOR_TEXT_SEL             White
#define CONTROLS_COLOR_BG                   White
#define CONTROLS_COLOR_BG_SEL               C'0x33,0x99,0xFF'
//--- 按钮
#define CONTROLS_BUTTON_COLOR               C'0x3B,0x29,0x28'
#define CONTROLS_BUTTON_COLOR_BG            C'0xDD,0xE2,0xEB'
#define CONTROLS_BUTTON_COLOR_BORDER        C'0xB2,0xC3,0xCF'
//--- 标签
#define CONTROLS_LABEL_COLOR                C'0x3B,0x29,0x28'
//--- 编辑框
#define CONTROLS_EDIT_COLOR                 C'0x3B,0x29,0x28'
#define CONTROLS_EDIT_COLOR_BG              White
#define CONTROLS_EDIT_COLOR_BORDER          C'0xB2,0xC3,0xCF'
//--- 滚动条
#define CONTROLS_SCROLL_COLOR_BG            C'0xEC,0xEC,0xEC'
#define CONTROLS_SCROLL_COLOR_BORDER        C'0xD3,0xD3,0xD3'
//--- 客户区域
#define CONTROLS_CLIENT_COLOR_BG            C'0xDE,0xDE,0xDE'
#define CONTROLS_CLIENT_COLOR_BORDER        C'0x2C,0x2C,0x2C'
//--- 列表视图
#define CONTROLS_LISTITEM_COLOR_TEXT        C'0x3B,0x29,0x28'
#define CONTROLS_LISTITEM_COLOR_TEXT_SEL    White
#define CONTROLS_LISTITEM_COLOR_BG          White
#define CONTROLS_LISTITEM_COLOR_BG_SEL      C'0x33,0x99,0xFF'
#define CONTROLS_LIST_COLOR_BG              White
#define CONTROLS_LIST_COLOR_BORDER          C'0xB2,0xC3,0xCF'
//--- 复选框组
#define CONTROLS_CHECKGROUP_COLOR_BG        C'0xF7,0xF7,0xF7'
#define CONTROLS_CHECKGROUP_COLOR_BORDER    C'0xB2,0xC3,0xCF'
//--- 单选框组
#define CONTROLS_RADIOGROUP_COLOR_BG        C'0xF7,0xF7,0xF7'
#define CONTROLS_RADIOGROUP_COLOR_BORDER    C'0xB2,0xC3,0xCF'
//--- 对话框
#define CONTROLS_DIALOG_COLOR_BORDER_LIGHT  White
#define CONTROLS_DIALOG_COLOR_BORDER_DARK   C'0xB6,0xB6,0xB6'
#define CONTROLS_DIALOG_COLOR_BG            C'0xF0,0xF0,0xF0'
#define CONTROLS_DIALOG_COLOR_CAPTION_TEXT  C'0x28,0x29,0x3B'
#define CONTROLS_DIALOG_COLOR_CLIENT_BG     C'0xF7,0xF7,0xF7'
#define CONTROLS_DIALOG_COLOR_CLIENT_BORDER C'0xC8,0xC8,0xC8'
为了改变这些宏替换, 要使用 #undef 转义符:
#undef 转义符是用于取消之前声明的宏定义的。
于是,我们就有了下面的算法: 取消之前声明的宏; 然后使用修改过的参数重新声明宏。我们应该为此使用下面的技巧: 在 Dialog.mqh之前包含 Defines.mqh 文件 :
//+------------------------------------------------------------------+
//|                                          AppWindowEditDefine.mq5 |
//|                        Copyright 2018, MetaQuotes Software Corp. |
//|                                              http://www.mql5.com |
//+------------------------------------------------------------------+
#property copyright "Copyright 2018, MetaQuotes Software Corp."
#property link      "http://www.mql5.com"
#property version   "1.001"
#property description "控制面板与对话框. 演示 CBmpButton 类"
#include <Controls/Defines.mqh>
在包含 “Defines.mqh” 后取消宏定义:
#undef CONTROLS_FONT_NAME
#undef CONTROLS_FONT_SIZE

#undef CONTROLS_BUTTON_COLOR
#undef CONTROLS_BUTTON_COLOR_BG
#undef CONTROLS_BUTTON_COLOR_BORDER

#undef CONTROLS_DIALOG_COLOR_BORDER_LIGHT
#undef CONTROLS_DIALOG_COLOR_BORDER_DARK
#undef CONTROLS_DIALOG_COLOR_BG
#undef CONTROLS_DIALOG_COLOR_CAPTION_TEXT
#undef CONTROLS_DIALOG_COLOR_CLIENT_BG
#undef CONTROLS_DIALOG_COLOR_CLIENT_BORDER
写下输入参数:
input string   font_name                  = "Trebuchet MS";
input int      font_size                  = 10;

input color    button_color               = C'0x3B,0x29,0x28';
input color    button_color_bg            = C'0xDD,0xE2,0xEB';
input color    button_color_border        = C'0xB2,0xC3,0xCF';

input color    dialog_color_border_light  = White;
input color    dialog_color_border_dark   = C'0xB6,0xB6,0xB6';
input color    dialog_color_bg            = C'0xF0,0xF0,0xF0';
input color    dialog_color_caption_text  = C'0x28,0x29,0x3B';
input color    dialog_color_client_bg     = C'0xF7,0xF7,0xF7';
input color    dialog_color_client_border = C'0xC8,0xC8,0xC8';
最有趣的部分: 我们再次声明宏定义,而这一次我们使用输入参数作为它们的值:
#define CONTROLS_FONT_NAME                font_name
#define CONTROLS_FONT_SIZE                font_size

#define CONTROLS_BUTTON_COLOR             button_color
#define CONTROLS_BUTTON_COLOR_BG          button_color_bg
#define CONTROLS_BUTTON_COLOR_BORDER      button_color_border

#define CONTROLS_DIALOG_COLOR_BORDER_LIGHT dialog_color_border_light
#define CONTROLS_DIALOG_COLOR_BORDER_DARK dialog_color_border_dark
#define CONTROLS_DIALOG_COLOR_BG          dialog_color_bg
#define CONTROLS_DIALOG_COLOR_CAPTION_TEXT dialog_color_caption_text
#define CONTROLS_DIALOG_COLOR_CLIENT_BG   dialog_color_client_bg
#define CONTROLS_DIALOG_COLOR_CLIENT_BORDER dialog_color_client_border

#include <Controls/Dialog.mqh>
#include <Controls/BmpButton.mqh>
例子:
CAppDialog 的总结
我们的面板是 CAppDialog 类的对象,它有继承的 ControlsTotal 方法( 容器中控件的数量) ,来自 CWndContainer 类,所以,我们可以遍历所有的 面板中的控件并在它们中进行一些操作,这些元件 是在父类CDialog类的private区域定义的:
//+------------------------------------------------------------------+
//| Class CDialog                                                    |
//| 用法: 用于创建对话框                                                |
//|          和指标面板的基类                                           |
//+------------------------------------------------------------------+
class CDialog : public CWndContainer
  {
private:
   //--- 依赖的控件
   CPanel            m_white_border;        // "白色边框" 对象
   CPanel            m_background;          // 背景对象
   CEdit             m_caption;             // 窗口标题对象
   CBmpButton        m_button_close;        // "关闭"按钮对象
   CWndClient        m_client_area;         // 客户区域对象

protected:
调试器可以看到这些对象是怎样创建的:
//+------------------------------------------------------------------+
//| 创建一个控件                                                       |
//+------------------------------------------------------------------+
bool CDialog::Create(const long chart,const string name,const int subwin,const int x1,const int y1,const int x2,const int y2)
  {
//--- 调用父类的方法
   if(!CWndContainer::Create(chart,name,subwin,x1,y1,x2,y2))
      return(false);
//--- 创建依赖的控件
   if(!m_panel_flag && !CreateWhiteBorder())
      return(false);
   if(!CreateBackground())
      return(false);
   if(!CreateCaption())
      return(false);
   if(!CreateButtonClose())
      return(false);
   if(!CreateClientArea())
      return(false);
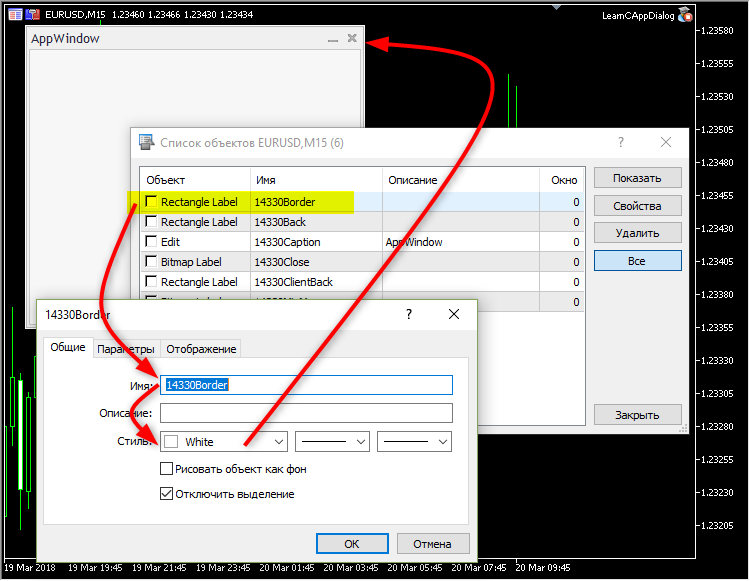
以及名称是怎样赋予它们的: m_white_border -> “29437Border”, m_background -> “29437Back”, m_caption -> “29437Caption”, m_button_close -> “29437Close”, m_client_area -> “29437Client”. 在这些名称中,”29437″ 是面板在其生命周期中的标识数字。
这样,我们就可以改变面板元件的一些属性了。例如,我们可以修改m_client_area和 m_background 对象的颜色:
//+------------------------------------------------------------------+
//|                                            LearnCAppDialog_1.mq5 |
//|                        Copyright 2018, MetaQuotes Software Corp. |
//|                                             https://www.mql5.com |
//+------------------------------------------------------------------+
#property copyright "Copyright 2018, MetaQuotes Software Corp."
#property link      "https://www.mql5.com"
#property version   "1.00"
#include <Controls/Dialog.mqh>

CAppDialog AppWindow;
//+------------------------------------------------------------------+
//| EA交易初始化函数                                                    |
//+------------------------------------------------------------------+
int OnInit()
  {
//--- 创建应用程序对话框
   if(!AppWindow.Create(0,"AppWindow",0,20,20,360,324))
      return(INIT_FAILED);
//---
   int total=AppWindow.ControlsTotal();
   CWndClient*myclient;
   for(int i=0;i<total;i++)
     {
      CWnd*obj=AppWindow.Control(i);
      string name=obj.Name();
      PrintFormat("%d 是 %s",i,name);
      //--- 颜色
      if(StringFind(name,"Client")>0)
        {
         CWndClient *client=(CWndClient*)obj;
         client.ColorBackground(clrRed);
         myclient=client;
         Print("client.ColorBackground(clrRed);");
         ChartRedraw();
        }
      //---
      if(StringFind(name,"Back")>0)
        {
         CPanel *panel=(CPanel*) obj;
         panel.ColorBackground(clrGreen);
         Print("panel.ColorBackground(clrGreen);");
         ChartRedraw();
        }
     }
   AppWindow.Delete(myclient);
//--- 运行应用程序
   AppWindow.Run();
//--- 成功
   return(INIT_SUCCEEDED);
  }
//+------------------------------------------------------------------+
//| EA 交易终止函数                                                    |
//+------------------------------------------------------------------+
void OnDeinit(const int reason)
  {
//--- 销毁对话框
   AppWindow.Destroy(reason);
  }
//+------------------------------------------------------------------+
//| EA 交易图表事件函数                                                 |
//+------------------------------------------------------------------+
void OnChartEvent(const int id,         // 事件 ID
                  const long& lparam,   // 长整数类型的事件参数
                  const double& dparam, // 双精度小数类型的事件参数
                  const string& sparam) // 字符串类型的事件参数
  {
   AppWindow.ChartEvent(id,lparam,dparam,sparam);
  }
//+------------------------------------------------------------------+
注意这一行代码: 它包含了对CWndContainer::Delete方法的调用, 它会从组(容器)中删除一个元件。在 m_client_area 元件从组中删除后,如果您尝试移动面板,相应的命令将不会传给 m_client_area 对象了,客户区域将一直待在它的位置上:
然而,当您关闭面板的时候,m_client_area元件将会从图表中与其他元件一起被删除。
在下面的例子中, 我们没有使用CWndContainer::Delete ,而是用了CWndContainer::Destroy 方法,它会销毁 m_client_area 对象:
//+------------------------------------------------------------------+
//|                                            LearnCAppDialog_2.mq5 |
//|                        Copyright 2018, MetaQuotes Software Corp. |
//|                                             https://www.mql5.com |
//+------------------------------------------------------------------+
#property copyright "Copyright 2018, MetaQuotes Software Corp."
#property link      "https://www.mql5.com"
#property version   "1.00"
#include <Controls/Dialog.mqh>

CAppDialog AppWindow;
//+------------------------------------------------------------------+
//| EA交易初始化函数                                                    |
//+------------------------------------------------------------------+
int OnInit()
  {
//--- 创建应用程序对话框
   if(!AppWindow.Create(0,"AppWindow",0,20,20,360,324))
      return(INIT_FAILED);
//---
   int total=AppWindow.ControlsTotal();
   CWndClient*myclient;
   for(int i=0;i<total;i++)
     {
      CWnd*obj=AppWindow.Control(i);
      string name=obj.Name();
      PrintFormat("%d 是 %s",i,name);
      //--- 颜色
      if(StringFind(name,"Client")>0)
        {
         CWndClient *client=(CWndClient*)obj;
         client.ColorBackground(clrRed);
         myclient=client;
         Print("client.ColorBackground(clrRed);");
         ChartRedraw();
        }
      //---
      if(StringFind(name,"Back")>0)
        {
         CPanel *panel=(CPanel*) obj;
         panel.ColorBackground(clrGreen);
         Print("panel.ColorBackground(clrGreen);");
         ChartRedraw();
        }
     }
   Sleep(5000);
   myclient.Destroy();
//--- 运行应用程序
   AppWindow.Run();
//--- 成功
   return(INIT_SUCCEEDED);
  }
//+------------------------------------------------------------------+
//| EA 交易终止函数                                                    |
//+------------------------------------------------------------------+
void OnDeinit(const int reason)
  {
//--- 销毁对话框
   AppWindow.Destroy(reason);
  }
//+------------------------------------------------------------------+
//| EA 交易图表事件函数                                                 |
//+------------------------------------------------------------------+
void OnChartEvent(const int id,         // 事件 ID
                  const long& lparam,   // 长整数类型的事件参数
                  const double& dparam, // 双精度小数类型的事件参数
                  const string& sparam) // 字符串类型的事件参数
  {
   AppWindow.ChartEvent(id,lparam,dparam,sparam);
  }
//+------------------------------------------------------------------+
这里是它如何运行的: 在创建面板之后,有5秒钟的暂停,然后客户区域就被销毁:
如何增加新的控件: 两个按钮
让我们修改来自 “基于 CAppDialog 创建面板” 部分的 EA 交易,在面板上加上两个基于 CButton 类的按钮,并且把它另存为 AppWindowTwoButtons.mq5. 在加上按钮之前 (与设计任何面板类似), 您必须考虑它们的大小和位置,假定,下面的图片显示了我们想要创建的带有按钮的面板:
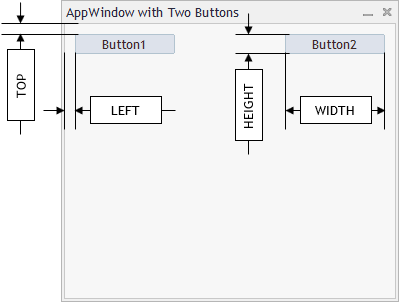
其中:
- TOP 是距离客户区域顶部边框的距离 (由 INDENT_TOP 常数设置)
- LEFT 是距离客户区域左边边界的距离 (由 INDENT_LEFT 常数设置)
- HEIGHT 是按钮的高度 (由 BUTTON_HEIGHT 常数设置)
- WIDTH 是按钮的宽度 (由 BUTTON_WIDTH 常数设置)
我们需要的另一个常数是控件之间水平方向上的最小距离,让我们称它为 “CONTROLS_GAP_X”.
为了使用 CButton 类, 我们需要 首先关联它:
//+------------------------------------------------------------------+
//|                                          AppWindowTwoButtons.mq5 |
//|                        Copyright 2018, MetaQuotes Software Corp. |
//|                                              http://www.mql5.com |
//+------------------------------------------------------------------+
#property copyright "Copyright 2018, MetaQuotes Software Corp."
#property link      "http://www.mql5.com"
#property version   "1.001"
#property description "控制面板与对话框. 演示 CButton 类"
#include <Controls/Dialog.mqh>
#include <Controls/Button.mqh>
下一步,我们加上按钮大小和位置的常数:
//+------------------------------------------------------------------+
//| 定义                                                              |
//+------------------------------------------------------------------+
//--- 缩进和距离
#define INDENT_LEFT                         (11)      // 与左边的缩进 (包括允许的边框宽度)
#define INDENT_TOP                          (11)      // 与顶部的缩进 (包括允许的边框宽度)
#define CONTROLS_GAP_X                      (5)       // X 坐标上的距离
//--- 用于按钮
#define BUTTON_WIDTH                        (100)     //  X 坐标上的大小
#define BUTTON_HEIGHT                       (20)      // Y 坐标上的大小
//---
在程序的全局水平声明 两个 CButton 类的实例:
#define BUTTON_HEIGHT                       (20)      // Y 坐标上的大小
//---
CAppDialog           AppWindow;
CButton              m_button1;                       // 按钮对象
CButton              m_button2;                       // 按钮对象
//+------------------------------------------------------------------+
//| EA交易初始化函数                                                    |
//+------------------------------------------------------------------+
int OnInit()
在全局水平声明按钮是一种不好的方法,因为这些实例 (以及它们的方法) 在EA交易的任何地方都可以看到。但是,我在这里这样做是为了减少代码量。
OnInit() 将有少量修改: 我们增加调用来验证创建按钮的结果:
//+------------------------------------------------------------------+
//| EA交易初始化函数                                                    |
//+------------------------------------------------------------------+
int OnInit()
  {
//--- 创建应用程序对话框
   if(!AppWindow.Create(0,"含有两个按钮的 AppWindow",0,40,40,380,344))
      return(INIT_FAILED);
//--- 创建依赖的控件
   if(!CreateButton1())
      return(false);
   if(!CreateButton2())
      return(false);
//--- 运行应用程序
   AppWindow.Run();
//--- 成功
   return(INIT_SUCCEEDED);
  }
让我们分析一下 CreateButton1() ,仔细看看按钮创建以及与面板关联的过程。
我们将使用下面的方法,即 CButton 类: Create 来创建按钮:
以及 Text 用于在按钮上加上文字 ( Text 方法继承于 CWndObj 类):

按钮是在这个阶段创建的,但是它是独立于面板存在的。为了绑定它们,我们需要执行 CDialog::Add 方法,它会把按钮加到面板的客户区域:
   if(!AppWindow.Add(m_button1))
      return(false);
//--- 成功
   return(true);
  }
这里是创建按钮的完整代码:
//+------------------------------------------------------------------+
//| 创建 "Button1" 按钮                                                |
//+------------------------------------------------------------------+
bool CreateButton1(void)
  {
//--- 坐标
   int x1=INDENT_LEFT;        // x1            = 11  像素
   int y1=INDENT_TOP;         // y1            = 11  像素
   int x2=x1+BUTTON_WIDTH;    // x2 = 11 + 100 = 111 像素
   int y2=y1+BUTTON_HEIGHT;   // y2 = 11 + 20  = 32  像素
//--- 创建
   if(!m_button1.Create(0,"Button1",0,x1,y1,x2,y2))
      return(false);
   if(!m_button1.Text("Button1"))
      return(false);
   if(!AppWindow.Add(m_button1))
      return(false);
//--- 成功
   return(true);
  }
不要忘记我们需要在 OnDeinit() 中销毁面板,并且把所有事件在 OnChartEvent() 中传递到表单中:
//+------------------------------------------------------------------+
//| EA 交易终止函数                                                    |
//+------------------------------------------------------------------+
void OnDeinit(const int reason)
  {
//---
   Comment("");
//--- 销毁对话框
   AppWindow.Destroy(reason);
  }
//+------------------------------------------------------------------+
//| EA 交易图表事件函数                                                 |
//+------------------------------------------------------------------+
void OnChartEvent(const int id,         // 事件 ID
                  const long& lparam,   // 长整数类型的事件参数
                  const double& dparam, // 双精度小数类型的事件参数
                  const string& sparam) // 字符串类型的事件参数
  {
   AppWindow.ChartEvent(id,lparam,dparam,sparam);
  }
//+------------------------------------------------------------------+
//| 创建 "Button1" 按钮                                               |
//+------------------------------------------------------------------+
嵌套的控件是如何移动和绘制的
请记住,AppWindow 面板是 CAppDialog 类的对象, 它是 CDialog 的子类,CDialog 本身是派生于 CWndContainer 的:
CWndContainer 是标准库中一组控件的基类,
这样,父类 CWndContainer 就可以控制面包中包含的整组控件的移动。
面板中所有控件的移动 都是在CWndContainer::Shift中循环进行的.
//+------------------------------------------------------------------+
//| 相对于控件组的移动                                                   |
//+------------------------------------------------------------------+
bool CWndContainer::Shift(const int dx,const int dy)
  {
//--- 调用父类的方法
   if(!CWnd::Shift(dx,dy))
      return(false);
//--- 在组内的元件中循环
   int total=m_controls.Total();
   for(int i=0;i<total;i++)
     {
      CWnd *control=Control(i);
      //--- 检查指针
      if(control==NULL)
         continue;
      //--- 移动组元素
      control.Shift(dx,dy);
     }
//--- 成功
   return(true);
  }
我们使用参考中的例子 – CBmpButton (位于 /MQL5/Experts/MyExp/Help/With the Panel. EN/ControlsBmpButton.mq5).
访问 CWndContainer::Shift 方法:
通过 CDialog 把 CAppDialog 加到控件组中
上面是一个有两个按钮的面板的例子,请记住,我提过了,在全局水平声明按钮不是一个好的例子,这里是一个更正确的例子: 用于创建面板和按钮的全部代码都位于派生于 CAppDialog 的类中。一个创建面板的例子在 AppWindowTwoButtonsClass.mq5 中,
CAppWindowTwoButtons 是 CAppDialog 的一个子类, 并且它包含下面的方法:
| Creation | |
|---|---|
| Create | 创建主控件: 面板 |
| CreateButton1 | 创建一个依赖的控件: button(按钮) #1 |
| CreateButton2 | 创建一个依赖的控件: button #2 |
AppWindowTwoButtonsClass.mq5 代码: 代码现在是在类的内部, 使用颜色作了突出显示:
//+------------------------------------------------------------------+
//|                                     AppWindowTwoButtonsClass.mq5 |
//|                        Copyright 2018, MetaQuotes Software Corp. |
//|                                              http://www.mql5.com |
//+------------------------------------------------------------------+
#property copyright "Copyright 2018, MetaQuotes Software Corp."
#property link      "http://www.mql5.com"
#property version   "1.000"
#property description "控制面板与对话框. 演示 CButton 类"
#include <Controls/Dialog.mqh>
#include <Controls/Button.mqh>
//+------------------------------------------------------------------+
//| 定义                                                              |
//+------------------------------------------------------------------+
//--- 缩进和距离
#define INDENT_LEFT                         (11)      // 与左边的缩进 (包括允许的边框宽度)
#define INDENT_TOP                          (11)      // 与顶部的缩进 (包括允许的边框宽度)
#define CONTROLS_GAP_X                      (5)       // X 坐标上的距离
//--- 用于按钮
#define BUTTON_WIDTH                        (100)     //  X 坐标上的大小
#define BUTTON_HEIGHT                       (20)      // Y 坐标上的大小
//---
//+------------------------------------------------------------------+
//| Class CAppWindowTwoButtons                                       |
//| 使用: 控件应用程序的主对话框                                          |
//+------------------------------------------------------------------+
class CAppWindowTwoButtons : public CAppDialog
  {
private:
   CButton           m_button1;                       // 按钮对象
   CButton           m_button2;                       // 按钮对象

public:
                     CAppWindowTwoButtons(void);
                    ~CAppWindowTwoButtons(void);
   //--- 创建
   virtual bool      Create(const long chart,const string name,const int subwin,const int x1,const int y1,const int x2,const int y2);

protected:
   //--- 创建依赖的控件
   bool              CreateButton1(void);
   bool              CreateButton2(void);

  };
//+------------------------------------------------------------------+
//| 构造函数                                                           |
//+------------------------------------------------------------------+
CAppWindowTwoButtons::CAppWindowTwoButtons(void)
  {
  }
//+------------------------------------------------------------------+
//| 析构函数                                                           |
//+------------------------------------------------------------------+
CAppWindowTwoButtons::~CAppWindowTwoButtons(void)
  {
  }
//+------------------------------------------------------------------+
//| 创建                                                              |
//+------------------------------------------------------------------+
bool CAppWindowTwoButtons::Create(const long chart,const string name,const int subwin,const int x1,const int y1,const int x2,const int y2)
  {
   if(!CAppDialog::Create(chart,name,subwin,x1,y1,x2,y2))
      return(false);
//--- 创建依赖的控件
   if(!CreateButton1())
      return(false);
   if(!CreateButton2())
      return(false);
//--- 成功
   return(true);
  }
//+------------------------------------------------------------------+
//| 全局变量                                                          |
//+------------------------------------------------------------------+
CAppWindowTwoButtons ExtDialog;
//+------------------------------------------------------------------+
//| EA交易初始化函数                                                    |
//+------------------------------------------------------------------+
int OnInit()
  {
//--- 创建应用程序对话框
   if(!ExtDialog.Create(0,"含有两个按钮的 AppWindowClass",0,40,40,380,344))
      return(INIT_FAILED);
//--- 运行应用程序
   ExtDialog.Run();
//--- 成功
   return(INIT_SUCCEEDED);
  }
//+------------------------------------------------------------------+
//| EA 交易终止函数                                                    |
//+------------------------------------------------------------------+
void OnDeinit(const int reason)
  {
//---
   Comment("");
//--- 销毁对话框
   ExtDialog.Destroy(reason);
  }
//+------------------------------------------------------------------+
//| EA 交易图表事件函数                                                 |
//+------------------------------------------------------------------+
void OnChartEvent(const int id,         // 事件 ID
                  const long& lparam,   // 长整数类型的事件参数
                  const double& dparam, // 双精度小数类型的事件参数
                  const string& sparam) // 字符串类型的事件参数
  {
   ExtDialog.ChartEvent(id,lparam,dparam,sparam);
  }
//+------------------------------------------------------------------+
//| 创建 "Button1" 按钮                                               |
//+------------------------------------------------------------------+
bool CAppWindowTwoButtons::CreateButton1(void)
  {
//--- 坐标
   int x1=INDENT_LEFT;        // x1            = 11  像素
   int y1=INDENT_TOP;         // y1            = 11  像素
   int x2=x1+BUTTON_WIDTH;    // x2 = 11 + 100 = 111 像素
   int y2=y1+BUTTON_HEIGHT;   // y2 = 11 + 20  = 32  像素
//--- 创建
   if(!m_button1.Create(0,"Button1",0,x1,y1,x2,y2))
      return(false);
   if(!m_button1.Text("Button1"))
      return(false);
   if(!Add(m_button1))
      return(false);
//--- 成功
   return(true);
  }
//+------------------------------------------------------------------+
//| 创建 "Button2"                                                    |
//+------------------------------------------------------------------+
bool CAppWindowTwoButtons::CreateButton2(void)
  {
//--- 坐标
   int x1=INDENT_LEFT+2*(BUTTON_WIDTH+CONTROLS_GAP_X);   // x1 = 11  + 2 * (100 + 5) = 221 像素
   int y1=INDENT_TOP;                                    // y1                       = 11  像素
   int x2=x1+BUTTON_WIDTH;                               // x2 = 221 + 100           = 321 像素
   int y2=y1+BUTTON_HEIGHT;                              // y2 = 11  + 20            = 31  像素
//--- 创建
   if(!m_button2.Create(0,"Button2",0,x1,y1,x2,y2))
      return(false);
   if(!m_button2.Text("Button2"))
      return(false);
   if(!Add(m_button2))
      return(false);
//--- 成功
   return(true);
  }
//+------------------------------------------------------------------+
让我们根据AppWindowTwoButtonsClass.mq5中的例子查看一下创建面板和控件的算法,所有的操作都是在 CAppWindowTwoButtons::Create 中进行的。
- 创建面板:
   if(!CAppDialog::Create(chart,name,subwin,x1,y1,x2,y2))
      return(false);
- 创建依赖的控件:
//--- 创建依赖的控件
   if(!CreateButton1())
      return(false);
   if(!CreateButton2())
      return(false);
- 最重要的时候是当按钮创建后,它不是依赖于我们面板的元件,而是独立存在的,为了使它成为依赖于面板的元件,我们应当调用 Add 方法 ( CDialog::Add 把指定指针/引用的控件加到客户区域)
...
   if(!Add(m_button1))
      return(false);
...
   if(!Add(m_button2))
      return(false);
...
在控件成为面板的依赖元件之后: 所有的事件会从面板中心分发到独立的控件中去。
怎样重写标准控件的行为
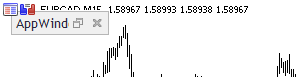
如果您最小化面板,它将会位于坐标 (10;10). 最小化的面板会与单击交易面板有部分重叠:
让我们修改这样的位置,并且加上检查看是否最大化了单击交易面板。为此我们需要重写父类的 CAppDialog::Minimize 方法。让我们创建另一个例子: AppWindowCorrectMinimization.mq5,也是基于“通过 CDialog 把 CAppDialog 加到控件组”部分的代码 AppWindowTwoButtons.mq5。
改动是: 声明 Minimize 方法:
protected:
   //--- 创建依赖的控件
   bool              CreateButton1(void);
   bool              CreateButton2(void);
   //--- 重写父方法
   virtual void      Minimize(void);

  };
并且写下方法的主体:
//+------------------------------------------------------------------+
//|                                                                  |
//+------------------------------------------------------------------+
void CAppWindowCorrectMinimization::Minimize(void)
  {
//--- 用于检查单击交易面板的变量l
   long one_click_visible=-1;  // 0 - 没有单击交易面板
   if(!ChartGetInteger(m_chart_id,CHART_SHOW_ONE_CLICK,0,one_click_visible))
     {
      //--- 在专家日志中显示错误消息
      Print(__FUNCTION__+", 错误代码 = ",GetLastError());
     }
//--- 用于最小化面板的最小缩进
   int min_y_indent=28;
   if(one_click_visible)
      min_y_indent=100;  // 如果图表中有单击交易面板,就使用这个缩进
//--- 取得最小化面板的当前缩进
   int current_y_top=m_min_rect.top;
   int current_y_bottom=m_min_rect.bottom;
   int height=current_y_bottom-current_y_top;
//--- 计算应用程序中最小化面板从顶部的缩进
   if(m_min_rect.top!=min_y_indent)
     {
      m_min_rect.top=min_y_indent;
      //--- 把下方边界移动到最小化图标之下
      m_min_rect.bottom=m_min_rect.top+height;
     }
//--- 现在我们可以调用基类的方法了
   CAppDialog::Minimize();
  }
怎样读取事件处理类型的内建宏定义
面板可以处理下面的事件 (使用 [data folder]/MQL5/Include/Controls/Defines.mqh” 中的”Events“)
//+------------------------------------------------------------------+
//| 事件                                                              |
//+------------------------------------------------------------------+
#define ON_CLICK                (0)   // 点击控件的事件
#define ON_DBL_CLICK            (1)   // 双击控件的事件
#define ON_SHOW                 (2)   // 显示控件的事件
#define ON_HIDE                 (3)   // 隐藏控件的事件
#define ON_CHANGE               (4)   // 修改控件的事件
#define ON_START_EDIT           (5)   // 开始编辑的事件
#define ON_END_EDIT             (6)   // 编辑结束的事件
#define ON_SCROLL_INC           (7)   // 滚动条增加的事件
#define ON_SCROLL_DEC           (8)   // 滚动条减小的事件
#define ON_MOUSE_FOCUS_SET      (9)   //  "鼠标光标进入控件" 的事件
#define ON_MOUSE_FOCUS_KILL     (10)  // "鼠标光标退出控件"的事件
#define ON_DRAG_START           (11)  // "开始拖曳控件"的事件
#define ON_DRAG_PROCESS         (12)  // "正在拖曳控件"的事件
#define ON_DRAG_END             (13)  // "结束拖曳控件"的事件
#define ON_BRING_TO_TOP         (14)  // "鼠标事件优先级提高"的事件
#define ON_APP_CLOSE            (100) // "关闭应用程序"的事件
这些事件是在 CAppDialog::OnEvent 方法中处理的,为了更好地从视觉中分辨不同类型的事件,在 [data folder]/MQL5/Include/Controls/Defines.mqh” 的 “Macro of event handling map(事件处理图的宏定义)” 部分中定义了几个宏:
//+------------------------------------------------------------------+
//| 事件处理图的宏定义                                                   |
//+------------------------------------------------------------------+
#define INTERNAL_EVENT                           (-1)
//--- 图的起始
#define EVENT_MAP_BEGIN(class_name)              bool class_name::OnEvent(const int id,const long& lparam,const double& dparam,const string& sparam) {
//--- 图的结束
#define EVENT_MAP_END(parent_class_name)         return(parent_class_name::OnEvent(id,lparam,dparam,sparam)); }
//--- 根据 ID 编号处理事件
#define ON_EVENT(event,control,handler)          if(id==(event+CHARTEVENT_CUSTOM) && lparam==control.Id()) { handler(); return(true); }
//--- 根据控件指针和数字ID进行事件的处理
#define ON_EVENT_PTR(event,control,handler)      if(control!=NULL && id==(event+CHARTEVENT_CUSTOM) && lparam==control.Id()) { handler(); return(true); }
//--- 不分析 ID 进行事件的处理
#define ON_NO_ID_EVENT(event,handler)            if(id==(event+CHARTEVENT_CUSTOM)) { return(handler()); }
//--- 根据行 ID 处理事件
#define ON_NAMED_EVENT(event,control,handler)    if(id==(event+CHARTEVENT_CUSTOM) && sparam==control.Name()) { handler(); return(true); }
//--- 处理索引的事件
#define ON_INDEXED_EVENT(event,controls,handler) { int total=ArraySize(controls); for(int i=0;i<total;i++) if(id==(event+CHARTEVENT_CUSTOM) && lparam==controls[i].Id()) return(handler(i)); }
//--- 处理外部事件
#define ON_EXTERNAL_EVENT(event,handler)         if(id==(event+CHARTEVENT_CUSTOM)) { handler(lparam,dparam,sparam); return(true); }
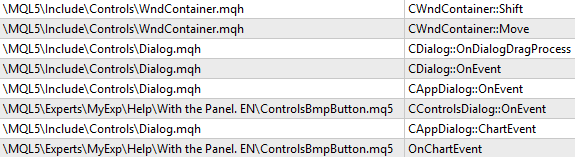
来自 “Events” 和 “Macro of event handling map(事件处理图的宏定义)” 模块的宏定义,使得 OnEvent 方法看起来如下:
//+------------------------------------------------------------------+
//| 事件的处理                                                         |
//+------------------------------------------------------------------+
EVENT_MAP_BEGIN(CControlsDialog)
ON_EVENT(ON_CLICK,m_bmpbutton1,OnClickBmpButton1)
ON_EVENT(ON_CLICK,m_bmpbutton2,OnClickBmpButton2)
EVENT_MAP_END(CAppDialog)
这是来自CBmpButton参考部分的代码, 以及 CControlsDialog 是 CAppDialog 类的一个实例, 它是类形式的一个面板。
考虑到来自”Macro of event handling map“部分的宏定义, OnEvent 将看起来如下:
bool CControlsDialog::OnEvent(const int id,const long& lparam,const double& dparam,const string& sparam) {
if(id==(ON_CLICK+CHARTEVENT_CUSTOM) && lparam==m_bmpbutton1.Id()) { OnClickBmpButton1(); return(true); }
if(id==(ON_CLICK+CHARTEVENT_CUSTOM) && lparam==m_bmpbutton2.Id()) { OnClickBmpButton2(); return(true); }
return(CAppDialog::OnEvent(id,lparam,dparam,sparam)); }
在使用了格式之后:
bool CControlsDialog::OnEvent(const int id,const long &lparam,const double &dparam,const string &sparam)
  {
   if(id==(ON_CLICK+CHARTEVENT_CUSTOM) && lparam==m_bmpbutton1.Id())
     {
      OnClickBmpButton1();
      return(true);
     }
   if(id==(ON_CLICK+CHARTEVENT_CUSTOM) && lparam==m_bmpbutton2.Id())
     {
      OnClickBmpButton2();
      return(true);
     }
   return(CAppDialog::OnEvent(id,lparam,dparam,sparam));
  }
结果得到的代码可以按下面方法阅读: 如果接收到了点击 m_bmpbutton1 元件的自定义事件,就调用 OnClickBmpButton1() 方法,如果接收到了点击 m_bmpbutton2 元件的自定义事件,就会调用 OnClickBmpButton2()。
事件处理的实例
我们使用 AppWindowTwoButtonsClass.mq5 作为基础,创建 AppWindowTwoButtonsClasssEvents.mq5,加上按钮事件处理函数,
第一步是声明 OnEvent, 以及 OnClickButton1 和 OnClickButton2.
//+------------------------------------------------------------------+
//| Class CControlsDialog                                            |
//| 使用: 控件应用程序的主对话框                                          |
//+------------------------------------------------------------------+
class CAppWindowTwoButtons : public CAppDialog
  {
private:
   CButton           m_button1;                       // 按钮对象
   CButton           m_button2;                       // 按钮对象

public:
                     CAppWindowTwoButtons(void);
                    ~CAppWindowTwoButtons(void);
   //--- 创建
   virtual bool      Create(const long chart,const string name,const int subwin,const int x1,const int y1,const int x2,const int y2);
   //--- 图表事件处理函数
   virtual bool      OnEvent(const int id,const long &lparam,const double &dparam,const string &sparam);

protected:
   //--- 创建依赖的控件
   bool              CreateButton1(void);
   bool              CreateButton2(void);
   //--- 依赖控件事件的处理函数
   void              OnClickButton1(void);
   void              OnClickButton2(void);

  };
第二步: OnEvent 方法, 因为使用了来自文件 [data folder]/MQL5/Include/Controls/Defines.mqh“中的Events” 和 “Macro of event handling map” 的宏定义,它的形式如下:
protected:
   //--- 创建依赖的控件
   bool              CreateButton1(void);
   bool              CreateButton2(void);
   //--- 依赖控件事件的处理函数
   void              OnClickButton1(void);
   void              OnClickButton2(void);

  };
//+------------------------------------------------------------------+
//| 事件的处理                                                         |
//+------------------------------------------------------------------+
EVENT_MAP_BEGIN(CAppWindowTwoButtons)
ON_EVENT(ON_CLICK,m_button1,OnClickButton1)
ON_EVENT(ON_CLICK,m_button2,OnClickButton2)
EVENT_MAP_END(CAppDialog)
//+------------------------------------------------------------------+
//| 构造函数                                                           |
//+------------------------------------------------------------------+
现在我们需要写下 OnClickButton1 和 OnClickButton2 的主体,点击 button 1 将会开启一个买入仓位,而点击 button 2 将会关闭仓位。
所以,让我们首先修改按钮上的文字 (修改实现于 CreateButton1 和 CreateButton2):
...
   if(!m_button1.Text("Open BUY"))
      return(false);
...
...
   if(!m_button2.Text("Close"))
      return(false);
...
现在,让我们确定我们需要关联的类: CTrade 类是交易所需要的, CPositionInfo 是操作仓位所需要的,而交易账户的类型是从CAccountInfo取得的:
#property description "控制面板与对话框. 演示 CButton 类"
#include <Controls/Dialog.mqh>
#include <Controls/Button.mqh>
#include <Trade/PositionInfo.mqh>
#include <Trade/Trade.mqh>
#include <Trade/AccountInfo.mqh>
//+------------------------------------------------------------------+
//| 定义                                                              |
为了能够操作这些类,我们需要在面板的 protected 部分声明这些类的实例:
class CAppWindowTwoButtons : public CAppDialog
  {
protected:
   CPositionInfo     m_position;                      // 交易仓位对象
   CTrade            m_trade;                         // 交易对象
   CAccountInfo      m_account;                       // 账户信息封装

private:
   CButton           m_button1;                       // 按钮对象
Click handling methods:
//+------------------------------------------------------------------+
//| 事件处理函数                                                        |
//+------------------------------------------------------------------+
void CAppWindowTwoButtons::OnClickButton1(void)
  {
   if(m_account.TradeMode()==ACCOUNT_TRADE_MODE_DEMO)
      m_trade.Buy(1.0);
  }
//+------------------------------------------------------------------+
//| 事件处理函数                                                       |
//+------------------------------------------------------------------+
void CAppWindowTwoButtons::OnClickButton2(void)
  {
   if(m_account.TradeMode()==ACCOUNT_TRADE_MODE_DEMO)
      for(int i=PositionsTotal()-1;i>=0;i--) // 返回当前仓位的数量
         if(m_position.SelectByIndex(i)) // 根据索引选择仓位,以进一步访问它的属性
            if(m_position.Symbol()==Symbol())
               m_trade.PositionClose(m_position.Ticket()); // 根据指定的交易品种关闭仓位
  }
现在,模拟账户中的面板可以作为交易面板了:点击第一个按钮开启一个买入仓位,而点击第二个按钮可以关闭所有仓位。
创建您自己的面板 – 这很简单!
这篇文章介绍了面板与对话框部分的类的大致继承结构,创建和管理基于标准库的任何图形面板,展示在 CAppDialog 类的例子中,另外,这个例子还展示了怎样访问基于 CAppDialog 的面板中包含的图形对象的属性,类似地,您可以操作任何 CWnd 类的子类。
另外,本文还提供了几种修改基于 CAppDialog 的内部面板控件属性的非标准方法,这些方法有助于理解图形对象是怎样运行的:
我希望这些例子有助于您创建自己的基于 CAppDialog 的面板,另外我推荐学习其他一些来自面板和对话框部分的其他控件的创建。
| 文件名 | 注释 |
|---|---|
| LearnCAppDialog.mq5 | 基于 CAppDialog 的面板的最少代码 |
| AppWindowEditDefine.mq5 | 一个EA交易的面板,重定义了来自 Defines.mqh 的常数 |
| LearnCAppDialog_1.mq5 | 修改了 “m_client_area” 和 “m_background” 对象的颜色 |
| LearnCAppDialog_2.mq5 | 我们使用了 CWndContainer::Destroy, 而不是 CWndContainer::Delete 来销毁 “m_client_area” 对象 |
| AppWindowTwoButtons.mq5 | 含有两个按钮的面板 |
| AppWindowTwoButtonsClass.mq5 | 含有两个按钮的面板类 |
| AppWindowCorrectMinimization.mq5 | 一个使用默认位置的面板例子 |
| AppWindowTwoButtonsClasssEvents.mq5 | 含有两个按钮的面板类. 处理按钮事件 |
本文译自 MetaQuotes Software Corp. 撰写的俄文原文
原文地址: https://www.mql5.com/ru/articles/4503
MyFxtop迈投(www.myfxtop.com)-靠谱的外汇跟单社区,免费跟随高手做交易!
免责声明:本文系转载自网络,如有侵犯,请联系我们立即删除,另:本文仅代表作者个人观点,与迈投财经无关。其原创性以及文中陈述文字和内容未经本站证实,对本文以及其中全部或者部分内容、文字的真实性、完整性、及时性本站不作任何保证或承诺,请读者仅作参考,并请自行核实相关内容。
著作权归作者所有。
商业转载请联系作者获得授权,非商业转载请注明出处。